As a homeowner, the “do-it-yourself” question comes up a lot. While I love a good weekend project, masonry work is one area where it’s crucial to know your limits. A small crack might seem like a simple fix, but is it just a cosmetic issue or a symptom of a deeper problem with your foundation? Making the wrong call can lead to more damage and even safety risks. That’s why knowing the difference between a minor patch job and a situation that requires professional masonry repair is so important. We’ll break down which tasks are safe to tackle on your own and highlight the red flags that mean it’s time to call in an expert.
Key Takeaways
- Inspect your masonry seasonally: A quick walk around your home each season helps you spot small issues like hairline cracks or crumbling mortar before they escalate. Early detection is your best defense against costly, large-scale repairs.
- Prioritize proper drainage: Water is the biggest threat to your masonry. Keep your gutters clean and make sure downspouts direct water far from your foundation to prevent moisture damage, freeze-thaw cycles, and structural stress.
- Leave major repairs to the professionals: While you can handle minor crack filling, red flags like bulging walls, deep cracks, or loose bricks signal a deeper problem. A professional can diagnose the root cause and ensure the structural integrity of your home is properly restored.
Warning Signs Your Masonry Needs Repair
Your home’s masonry is its first line of defense against the elements, but it’s not invincible. Catching problems early can save you from more extensive and expensive repairs down the road. Knowing what to look for is the first step. A quick walk around your property every few months can help you spot trouble before it gets serious. Here are the key warning signs that your masonry needs attention.
Spotting Cracked or Crumbling Mortar
Think of mortar as the glue that holds your bricks or stones together. When it starts to fail, the entire structure is at risk. Look for visible cracks in the joints between your bricks. While hairline cracks might not be an immediate emergency, larger, deeper cracks are a definite red flag. You should also check for mortar that looks sandy or is crumbling away when you touch it. This deterioration is often caused by moisture and age, and it means the bonds holding your masonry together are weakening. Timely resurfacing can fix these joints and restore your wall’s integrity.
Identifying Loose Bricks and Stones
If the mortar is crumbling, it’s only a matter of time before the bricks or stones themselves become loose. A loose brick isn’t just a cosmetic issue; it’s a breach in your home’s protective barrier. Each gap is an open invitation for water to seep into your walls, which can lead to mold, rot, and even structural damage over time. Gently press on any bricks that look out of place. If there’s any give or wiggle, it’s a sign that the mortar has failed. Addressing a few loose stones is much easier than rebuilding an entire section of a damaged wall with stone veneer.
Recognizing Water Damage and White Stains (Efflorescence)
Have you ever noticed a white, chalky substance on the surface of your brick or concrete? This is called efflorescence, and it’s a tell-tale sign of a moisture problem. It happens when water seeps into the masonry, dissolves the natural salts inside, and then evaporates, leaving the salt deposits behind. While you can scrub the stains off, they’ll keep coming back until you fix the underlying water issue. Also, keep an eye out for dark, damp patches on your walls, especially after it rains. Often, these issues are tied to your home’s drainage, so ensuring you have properly functioning gutters is essential.
Checking for Bulging or Leaning Walls
This is one of the most serious warning signs, and it requires immediate attention. If you notice a wall bulging outward or leaning, it indicates a significant structural problem. This can be caused by pressure from water freezing and expanding behind the wall, foundation settlement, or a failing wall tie system. A bulging wall is an unstable wall, posing a serious safety risk. This is not a DIY fix. If you see any bowing or leaning in your masonry, it’s time to call a professional to assess the structural integrity of your brickface and stucco right away.
What Causes Masonry Damage (And How to Prevent It)
Understanding why your masonry is damaged is the first step toward a lasting fix. Most issues with brick, stone, or stucco aren’t random; they’re caused by specific environmental factors. Once you know what to look for, you can take steps to protect your home’s exterior and prevent small problems from turning into major headaches. From harsh weather to hidden water issues, here are the most common culprits behind masonry damage.
The Impact of Weather and Freeze-Thaw Cycles
Here in New Jersey, we see all four seasons, and that change in weather takes a toll on our homes. The biggest threat to masonry is the freeze-thaw cycle. Bricks and mortar are porous, meaning they absorb small amounts of water from rain and humidity. When temperatures drop below freezing, that trapped water expands into ice, creating tiny cracks and putting pressure on the material from within. As it thaws, the water settles deeper into the new cracks. This cycle repeats all winter, gradually breaking down the mortar and causing the face of the bricks to flake off—a process called spalling. This is why you might notice more crumbling or cracking in the spring after a long, cold winter.
How Poor Drainage Leads to Damage
Water is masonry’s number one enemy, and your drainage system is its first line of defense. If your gutters are clogged or improperly pitched, rainwater won’t be directed away from your house. Instead, it will cascade down your walls, saturating the brick or stone. This constant moisture exposure accelerates the freeze-thaw cycle and can lead to efflorescence—those chalky white stains you see on brick. A faulty drainage system can also oversaturate the ground around your foundation, leading to even bigger structural problems. Keeping your gutters clean and functional is one of the most effective ways to protect your home’s exterior.
Understanding Foundation and Ground Movement
Sometimes, the cracks in your masonry have nothing to do with the bricks themselves but with the ground beneath your home. It’s natural for a house’s foundation to settle over time, but significant shifts in the soil can put immense stress on your walls. This often results in distinctive stair-step cracks that follow the mortar lines in a brick or block wall. Expansive clay soils, which swell when wet and shrink when dry, can also cause this kind of movement. While minor settling is normal, large or growing cracks are a clear sign that you should have your foundation and masonry inspected by a professional to rule out serious structural issues.
Simple Steps for Prevention
The best way to avoid expensive repairs is to be proactive. Start by walking around your home a few times a year to look for any changes. Pay close attention to the mortar joints, chimney, and the areas beneath windows and gutters. If you spot a small crack, addressing it early can prevent water from getting in and causing more extensive damage. Make sure your downspouts direct water at least a few feet away from your foundation and keep your gutters clear of leaves and debris. While some minor cosmetic fixes can be a DIY project, most masonry resurfacing and structural repairs require an expert to ensure they are done correctly and will last.
Your Guide to Common Masonry Repairs
Once you’ve spotted a potential problem with your masonry, it helps to understand what the repair process might look like. Different issues require different solutions, from simple mortar fixes to more involved structural work. Getting familiar with the terminology and techniques will help you have a more informed conversation when you call in a professional. Here’s a breakdown of some of the most common masonry repairs you might encounter.
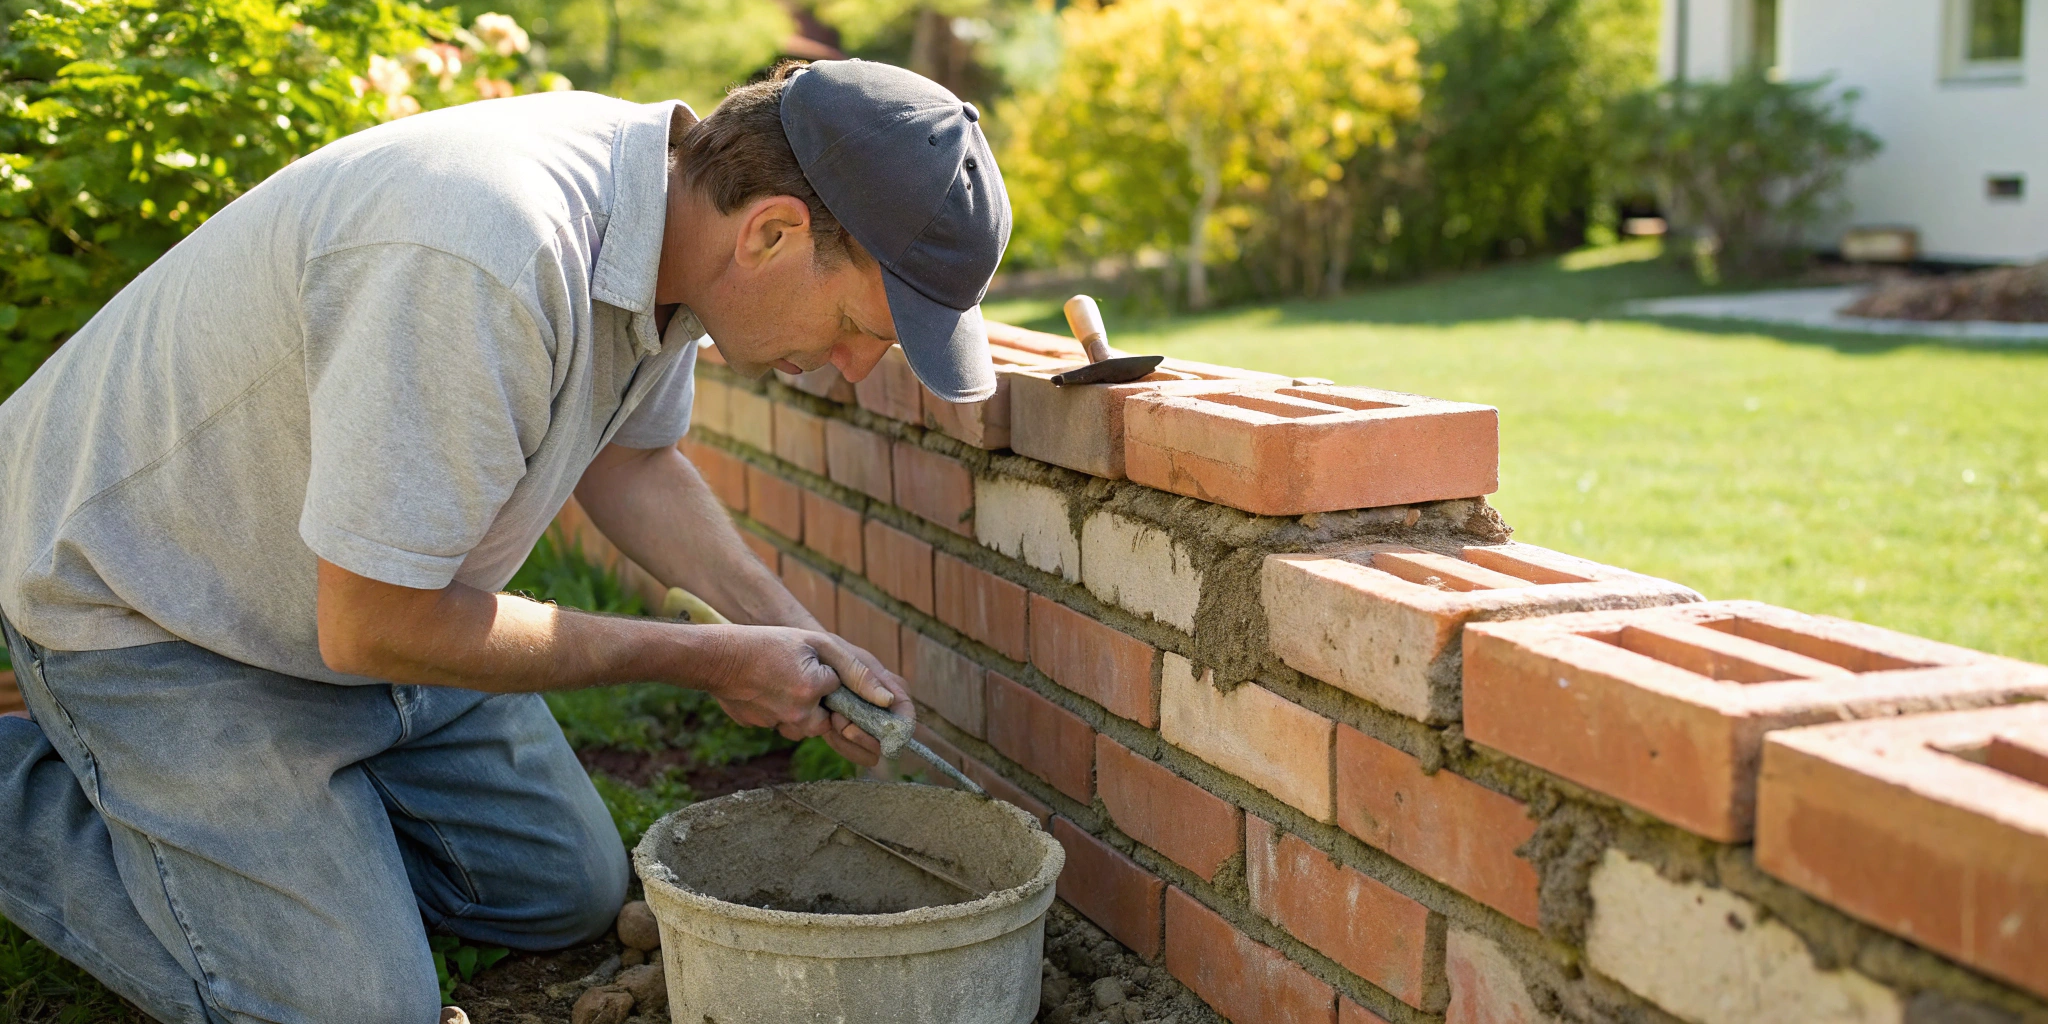
Tuckpointing and Repointing: What’s the Difference?
You’ve probably heard these terms used interchangeably, but they have slightly different meanings. Repointing is the general process of removing and replacing old, deteriorating mortar from the joints of a brick or stone wall. Tuckpointing is a specific type of repointing that creates a clean, finished look with contrasting lines of mortar. Either way, the goal is the same: to restore the integrity of the mortar joints. This isn’t just for looks; fresh mortar stops water from seeping behind your bricks, preventing much larger, more expensive problems down the road. It’s a critical step in maintaining a healthy and stable wall.
Replacing Damaged Bricks and Stones
Sometimes, the problem goes beyond the mortar. Bricks and stones can crack, chip, or flake away—a process called spalling—due to moisture and age. When this happens, simply patching the mortar isn’t enough. Damaged units need to be carefully removed and replaced to maintain the wall’s strength and prevent water from getting into the structure. A professional can find new bricks or stone veneer that matches your existing masonry in color, texture, and size, ensuring the repair blends in seamlessly. This fix restores not only the beauty of your home’s exterior but also its structural soundness.
Sealing Cracks and Waterproofing Your Masonry
Small cracks in your masonry might not seem like a big deal, but they are open invitations for water to enter and cause damage. Sealing these cracks promptly is essential to prevent them from widening and leading to moisture problems inside your walls. For more comprehensive protection, a professional can apply a waterproof sealant to the entire surface. While some minor crack-filling can be a DIY job, it’s best to call a professional for a lasting solution. They can properly diagnose the cause of the crack and use the right materials to fix it correctly, ensuring your brickface and stucco surfaces are protected.
Addressing Chimney and Structural Issues
Your chimney is one of the most exposed parts of your home, and its masonry takes a beating from the elements. A leaning chimney, loose bricks, significant cracks, or water leaks are all serious red flags. These issues can indicate deeper structural problems with the chimney or even your home’s foundation. Don’t wait to address these problems. A damaged chimney is a safety hazard that requires immediate attention from an expert. Professional resurfacing and repair can restore your chimney’s safety and function, protecting your home and family.
DIY vs. Calling a Pro: Which Repairs Can You Handle?
It’s tempting to roll up your sleeves and tackle home repairs yourself. While I’m all for a good DIY project, masonry work is one area where it pays to be cautious. Some fixes are perfectly manageable for a weekend warrior, but others can quickly become complex and even dangerous if you don’t have the right experience. Knowing the difference is key to protecting your home’s integrity and your own safety. Let’s walk through which repairs you can handle and when it’s time to put down the trowel and call in a professional.
Safe DIY Fixes for Minor Issues
If you’ve spotted a few hairline cracks in the mortar between your bricks, you can likely handle that yourself. Patching small, superficial cracks is a great entry-level masonry task. This usually involves cleaning out the old, loose mortar and applying a new patching compound. However, if you’re seeing larger cracks, crumbling that extends deep into the joint, or issues across a wide area, that’s a sign of a bigger problem. These situations often require a more involved technique called tuckpointing to properly repair the mortar joints, which is best left to someone with experience.
Your Essential DIY Toolkit
Ready to tackle those minor fixes? Having the right tools makes all the difference. You don’t need a professional-grade workshop, but a few key items will ensure the job is done correctly and safely. Before you start, make sure you have protective gear like gloves and safety glasses.
Your basic toolkit should include:
- A stiff bristle brush for cleaning out debris
- A pointing trowel and a brick trowel for applying mortar
- A garden hose to gently rinse the area
- A cold chisel and an engineer’s hammer for removing stubborn old mortar
- A 5-in-1 painter’s tool for scraping and cleaning
Red Flags: When to Call Garden State Brickface and Siding
Sometimes, a small sign points to a much larger issue. If you notice any of the following red flags, it’s time to call for a professional assessment. A DIY attempt on these problems could make things worse or mask an underlying structural concern.
Look out for:
- Bulging or leaning walls
- Large, deep cracks (wider than a quarter-inch) in bricks or mortar
- Multiple loose bricks or stones
- Signs of significant water damage or persistent white stains (efflorescence)
- Crumbling brick faces, not just the mortar
These are indicators that your home may need professional resurfacing or structural attention.
Why Some Repairs Demand an Expert
Calling a professional isn’t just about convenience; it’s about ensuring a safe, durable, and correct repair. An expert can accurately diagnose the root cause of the damage—it might not be what you think! They have the experience to perfectly match new mortar or bricks to your existing masonry, so the repair is seamless. Professionals also understand local building codes and ensure the structural integrity of your home is maintained. For complex jobs like brickface and stucco work, their expertise guarantees the project is done right the first time, preventing more costly repairs down the road.
How to Choose the Right Repair and Maintain Your Masonry
Making sure your home’s masonry is in good shape is about more than just curb appeal—it’s about protecting your investment and keeping your home structurally sound. Knowing what to look for and when to call for help is key. A little proactive care goes a long way in preventing small issues from turning into major, expensive headaches. Here’s how you can assess damage, understand your repair options, and create a simple maintenance plan to keep your brick, stone, or stucco looking its best for years to come.
Assessing the Severity of the Damage
Take a walk around your property and look closely at your home’s exterior. Keep an eye out for tell-tale warning signs like cracked mortar or bricks, or any stones that look loose. You might also spot white, chalky stains on the surface, which is called efflorescence and points to moisture problems. Are any walls bulging or leaning? Even slight changes can indicate a serious issue. Also, check the masonry around your windows and door frames for any signs of damage. If you notice any of these problems, even if they seem minor, it’s a good idea to get a professional opinion. A small crack can often be a symptom of a larger issue, and an expert can diagnose the root cause before it gets worse.
A Look at Repair Costs and Materials
When it comes to masonry repairs, calling a professional is almost always the right move. A seasoned contractor has the experience to correctly diagnose the problem, ensuring the fix is permanent, not just a temporary patch. One of the biggest challenges in masonry repair is matching new materials to your existing exterior. Professionals have access to a wide range of products and the skill to blend colors and textures for a seamless finish. They also use the proper tools and techniques to ensure your home remains structurally sound and compliant with local building codes. Investing in a professional brickface and stucco repair means you can trust the job is done right, saving you from more costly fixes down the road.
Your Long-Term Masonry Care Plan
Think of masonry maintenance as part of your regular home care routine. Being proactive is the best way to keep your home strong, safe, and looking great. Addressing small problems as soon as you spot them can stop them from escalating into bigger, more expensive projects. For example, sealing a small crack is much easier and cheaper than dealing with major water damage later on. A simple annual inspection is a great place to start. Every spring, walk around your home and check for any changes or signs of wear. This includes looking at your foundation, walls, and especially your chimney, as it’s often the first place to show signs of trouble that might require resurfacing.
Seasonal Tips to Protect Your Investment
Your masonry faces different challenges throughout the year, especially with New Jersey’s weather. In the fall, make sure your gutters are clean and clear to prevent water from overflowing and saturating your walls. Winter is tough, as the freeze-thaw cycle can turn tiny cracks into large ones when trapped water expands as it turns to ice. Once spring arrives, it’s the perfect time to inspect for any winter damage and schedule repairs. In the summer, consider having your masonry sealed. A quality sealant can help repel water from summer rainstorms, protecting your brick and mortar from moisture intrusion and extending the life of your home’s exterior.
Related Articles
Is it okay to just paint over cracks in my brick or stucco? That’s a common question, and while it seems like a quick fix, painting over masonry cracks is usually a bad idea. Paint can trap moisture inside the brick or stucco, which can lead to more significant damage from freeze-thaw cycles. It also just hides the problem. A crack is a sign that something needs to be addressed, and covering it up prevents you from fixing the root cause, which could be anything from water intrusion to foundation movement.
What’s the difference between a small crack I can ignore and one that needs professional attention? A good rule of thumb is to pay attention to any crack you can slide a quarter into. However, the type of crack is often more important than its size. Jagged, stair-step cracks that follow the mortar lines often point to foundation settling, which needs immediate professional assessment. Even smaller cracks that seem to be growing wider or longer over time are a red flag. When in doubt, it’s always best to have an expert take a look.
Why can’t I just pressure wash the white stains off my bricks? Those white, chalky stains, known as efflorescence, are salt deposits left behind by evaporating water. While pressure washing might remove the surface stains temporarily, it doesn’t solve the core issue, which is that water is getting into your masonry. In fact, blasting the surface with high-pressure water can force more moisture into the bricks and potentially damage the mortar, making the problem worse in the long run. The only permanent fix is to find and stop the source of the moisture.
How often should I really be checking my home’s masonry? You don’t need to be a professional inspector, but a quick walk around your home twice a year can make a huge difference. A great time to do this is in the spring, after the winter thaw, and again in the fall before the weather turns cold. Look for any new cracks, crumbling mortar, or signs of water damage, paying special attention to the chimney and the areas around your windows and downspouts. Catching these issues early is the best way to prevent a small repair from becoming a major project.
How do I know if a crack is from my foundation settling or just normal wear and tear? While only a professional can give you a definite answer, there are some clues you can look for. Cracks from normal aging are often thin, vertical lines found in a single mortar joint. Foundation issues, on the other hand, tend to create more dramatic cracks, like the distinctive stair-step patterns that run diagonally up a wall. You might also see corresponding cracks on your interior drywall or notice doors and windows that have become difficult to open or close.